Data application developers using Snowflake as the data warehouse and who are new to Kubernetes, spinning up a single cluster on their laptop and deploying their first application can seem deceptively simple.
As they start deploying data-driven applications using microservices and Kubernetes in production, the difficulty increases exponentially. It quickly throws the developer into a kind of configuration hellscape that drives productivity down for many data engineering teams.
From a business perspective, you want to ensure developers are focused on delivering value and applications that can directly impact your business results. Not on infrastructure. That’s where an application-focused layer can help you bring that focus back on track.
Deploying data-driven applications using Kubernetes and Snowflake
Let’s look at an example of an organization where their DevOps team wants to move towards microservices and wants their developers to deploy their applications to Kubernetes.
The challenge is balancing the need to evolve the infrastructure by allowing the DevOps team to move towards a new architecture without impacting the development speed.
Here is the stack we will use for this example:

- Developer: Our development teams are composed of data engineering teams that build and deploy data-focused applications.
- Data Warehouse: Snowflake is the selected warehouse, and the applications developed will be using Snowflake to serve data.
- Developer portal: Shipa will be used as both the application layer and the developer portal. Using Shipa, developers can focus on deploying their application code rather than infrastructure components. Shipa will enforce the defined policies and enable developers to have complete visibility over their applications and model once deployed.
- Kubernetes: As the organization moves towards microservices and Kubernetes in our example, GKE will be used as the infrastructure to host our application.
Pre-requisites
For this example, you need to have access to:
- Shipa Cloud account: You can sign up for a free account here: https://apps.shipa.cloud/auth/register
- Snowflake account: Sign up for a free account here: https://signup.snowflake.com/
We also assume that you understand the concepts of policy frameworks in Shipa, how to create them, and how to bind these policies to your Kubernetes cluster. You can find more information about Shipa’s policy frameworks here:
- Managing policy frameworks: Framework Management (shipa.io)
- Binding policies to clusters: Connecting Clusters (shipa.io)
Deploying a Citybike sample application
We will be deploying a sample application provided by Snowflake. Snowflake makes both the database data and the application code available.
For the database creation and data load, you can follow the instructions described in this link: Building a Data Application (snowflake.com)
For the application source code, you can clone the repository available in this link: Snowflake-Labs/sfguide-data-apps-demo (github.com)
Environment Variables
For the application to successfully connect to your Snowflake data warehouse, you will need to make a copy of the config file and adjust it to reflect your specific configuration. In our case, here is what I did:
cp config-template.js config.js
Instead of entering my DB information directly into the file, I used the following environment variables:
- SF_ACCOUNT: My Snowflake account information
- SF_USER: The user created during the database setup process. If you followed the steps described in the Snowflake tutorial, the user would be
DATA_APPS_DEMO. - SF_DATABASE: A variable for my Snowflake database name. Following the tutorial, it will be
DATA_APPS_DEMO. - SF_SCHEMA: The DB schema that my app will consume. In this case,
DEMO - SF_WH: The warehouse used by my application, which will be
DATA_APPS_DEMObased on the tutorial setup.
Here is what my config file looks like:
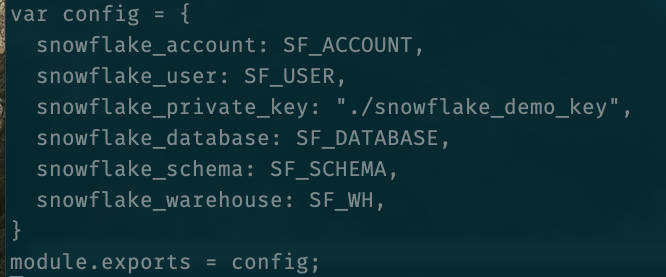
I did this so developers could later enter this information by pulling it from sources such as HashiCorp Vault, CI pipeline secrets, or others.
With the config file ready, you should create a file called Procfile in the root directory of our code. This file will be responsible for starting up the application once it is deployed. Here is the content of my file:
web: npm start
With our application source code ready, we can now start the deployment process. As mentioned previously, this example assumes that you have already created a Shipa policy framework and bound it to your Kubernetes cluster.
In my case, I have created a policy framework called dev and bound it to a GKE cluster.
First, let’s use Shipa to create our Citybike application and use the dev policy framework:
❯ shipa app create sf-citybike -k dev
We can see our application was created, but our code has not been deployed yet:

With our application created, we can define the environment variables, so developers can enter the appropriate information that the application will use, as described in our config.js file above.
You can define your environment variables using Shipa’s application portal:
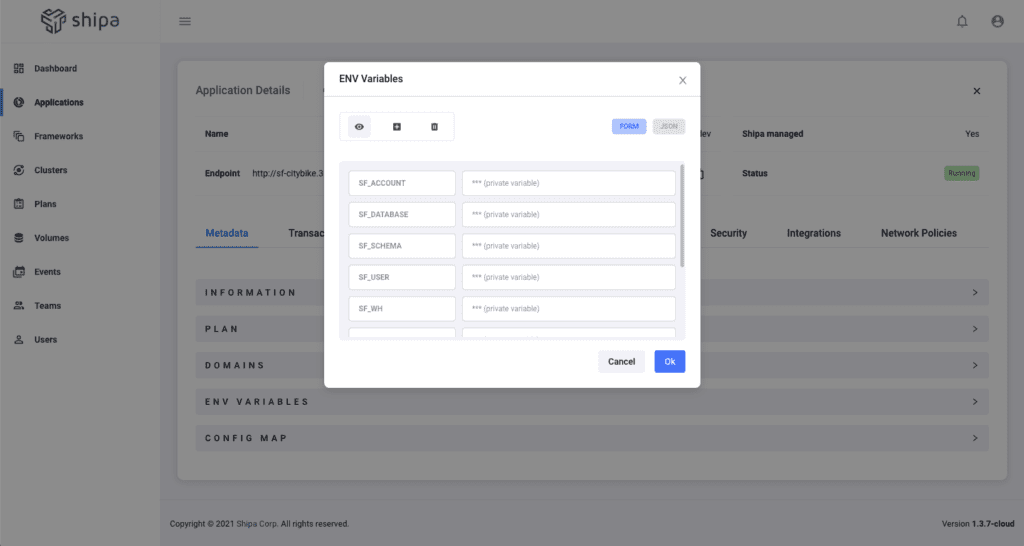
As I mentioned before, although I’m entering these variables directly through Shipa, developers could use their CI pipeline secrets, HashiCorp Vault, or others.
With the application created and environment variables set, we can now proceed to deploy our source code.
Since we will be deploying from the source code directly, Shipa will automatically create the image for you and store it in your container registry of choice. Before deploying the application, make sure that you have logged into your container registry from your terminal. You can do it using docker login.
Once logged in, you can deploy your application using the command below:
❯ shipa app deploy -a sf-citybike . -i shiparepo/sf-citybike:latest --port 3000
The command above will:
- Build the Docker image from your source and store it in your Docker repository. In my case, it will store inside Docker Hub
shiparepowith the namesf-citybike - It will deploy and expose our application using port 3000.
Once the deployment starts, you can immediately see the application available in the Shipa portal
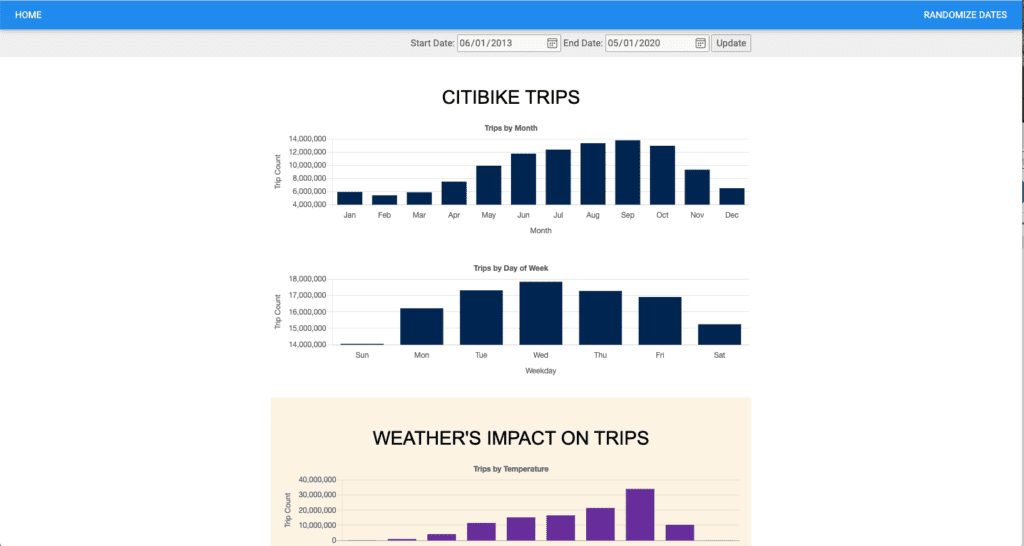
As you can see in the Endpoint field, Shipa automatically creates an endpoint for your developers and users to access the application:
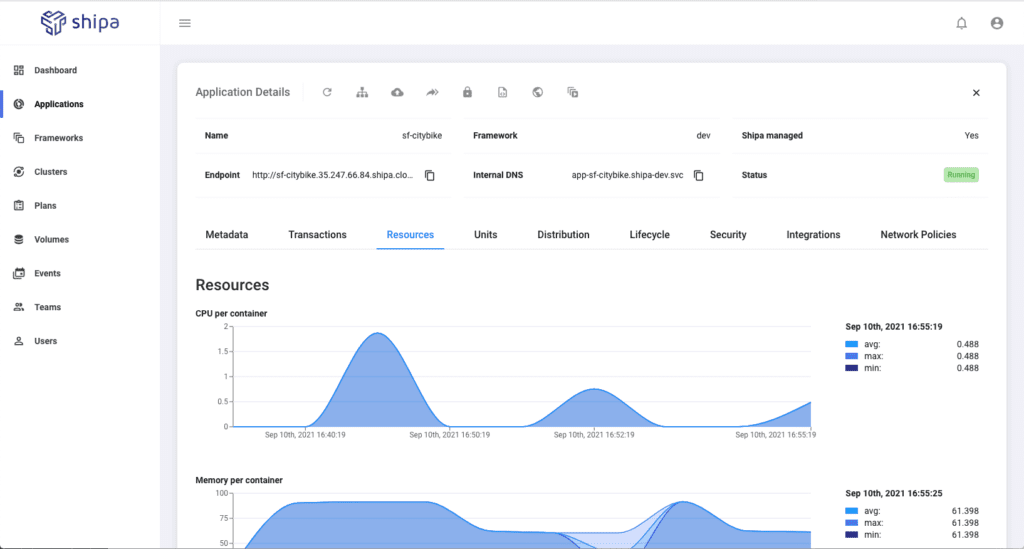
From here, your end-users can access your Citybike application dashboard, and your developers can have complete visibility over application log, performance, health status, and more:
Looking at the steps performed, we can see that:
- We used the GKE cluster and enabled the DevOps team to move faster towards a new architecture.
- Our developers focused only on their application code and could deploy the application fast without even knowing Kubernetes is part of the infrastructure.
- We consumed services from Snowflake, allowing us to use the best service for our applications.
What’s Next?
We will be exploring further use-cases on how Shipa enables developers to quickly deploy and manage applications consuming specific services that best fit their needs while allowing the DevOps team to continue evolving their applications.
Do you want to see a specific use case addressed? Join our Slack channel and send your suggestions!