TL;DR
- For a cluster to be ready for applications, DevOps and Platform teams have to implement, integrate, and manage several independent components
- Scaling this model has proven to be challenging and time consuming
- Using Crossplane and Shipa, teams can build application-ready clusters in minutes using a scalable model
History
Much has been written over the years about DevOps and, maybe a bit more recently, about Platform Engineering.
Both jobs focus heavily on designing, building, maintaining, extending, and automating underlying infrastructure components (e.g., Kubernetes, monitoring, security, pipelines, etc.), so their end-users, often developers, can consume it as an integrated platform.
While there are clear benefits to bringing together all these components in a platform format, building a consumable and automated platform is often complex, time-consuming, and expensive. Complexity increases even further as you use different providers, versions, onboard different teams, applications, and more.
Suppose you could instead quickly build “application-ready” clusters where you can plug multiple providers, quickly onboard multiple teams, deliver application observability, and enable a self-service model. In that case, you could then shift your focus to governance and scalability instead.
By doing so, you can deliver noticeable results across different teams in minutes instead of months (or years in some cases), improve developer productivity, give SREs the information they need, and provide DevSecOps teams with application, policy, and infrastructure change history.
This piece will show you how to build “application-ready” clusters in a few minutes using Crossplane and Shipa. Here are the steps we will cover:

Here is how we will use the two products:
- Crossplane: Will use it for infrastructure-level automation, such as creating clusters, connecting policies, running deployments, and others.
- Shipa: Application layer responsible for providing application-level policy and deployment constructs and a developer portal.
Requirements
For you to follow this example, you will need:
- An existing Kubernetes cluster
- Local kubectl configured to access the cluster
- Crossplane installed in that cluster (instructions on installing Crossplane here)
- Crossplane CLI installed (instructions available here)
- A Shipa Cloud account (you can sign up for a free account here)
- Git repository with the automation scripts cloned (here is the link to the repo)
Configuring the GCP provider
I’m using Google Cloud (and Google Kubernetes Engine – Aka GKE) in this example. For Crossplane to connect to your Google account, you need to install Crossplane’s GCP provider.
Assuming you already have your cluster running, kubectl connected to it, Crossplane installed in that cluster, and the Crossplane CLI installed locally, you can install the GCP provider using the command below:
kubectl crossplane install configuration registry.upbound.io/xp/getting-started-with-gcp:v1.5.1The provider install process should only take a few seconds, and you can check the status of the install using the command below:
kubectl get pods -n crossplane-systemWith the GCP provider installed, it’s time to connect it to your Google Cloud account.
If you cloned the Git repository mentioned in the requirements part, inside the scripts folder, you will find a file called env_vars.sh
These are the fields you will need to change in that file:
- GPC_PROJECT_ID: This is the name of your Google Cloud project.
- GCP_SERVICE_ACCOUNT_NAME: The name of the service account for your Google Cloud project
- GCP_SERVICE_ACCOUNT_KEYFILE: This is the fully-qualified name of the JSON service account private key stored on your local machine. For example, /home/user/my-google-file.json. This JSON private key is generated upon the creation of the Service Account.
- GKE_CLUSTER_NAME: The name of the existing Kubernetes cluster where you installed Crossplane
- GKE_CLUSTER_ZONE: The zone where you created the exiting Kubernetes cluster
If you don’t have your Google Cloud account and kubectl configured locally yet, you can now do it by using the following command:
./scripts/1-gcp_config.shTo complete your GCP provider configuration, run the following script:
./scripts/3-configure-gcp-provider.shInstead of hard-coding your GCP provider configuration in a YAML file, the script above uses templating instead, using the Linux envsubst. This replaces environment variables in the provider-config-gcp.template.yml file with their values and creates a new file called provider-config-gcp.yml, with values from env_vars.sh.
The action above also creates a Kubernetes Secret containing your GCP Service Account key file. A ProviderConfig custom resource uses the Secret to authenticate to your Google Cloud project.
Configuring the Shipa Provider
Configuring the Shipa provider for Crossplane is composed of 2 quick steps:
- Installing the provider itself
- Configuring the provider so that it can access your Shipa Cloud account
You can find detailed information here
Delivering the Promised Land
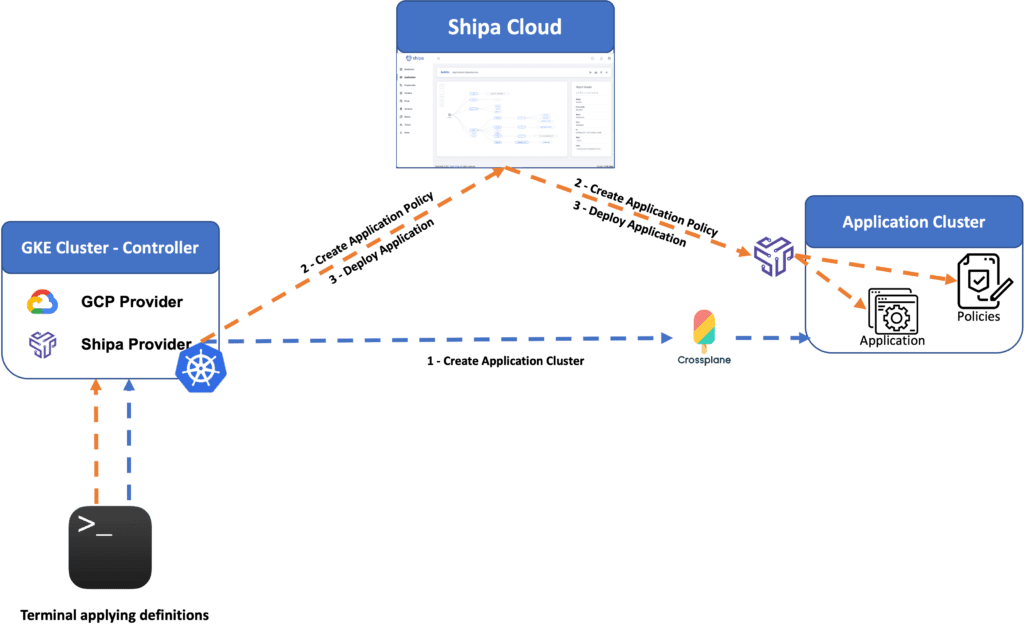
With Crossplane installed in our clusters and both GCP and Shipa providers configured and ready to be used, it’s now time to start delivering our application-ready clusters. Here is the architecture of how it will work:
Creating The Cluster
As part of the Git repository, I have included a sample provided by Crossplane to create a GKE cluster. You can run it using the following command:
./scripts/4-create_gke_cluster.shCreating the cluster will take a few minutes, and you can check the status directly on Google Cloud’s dashboard.
Creating An Application Policy
The policy framework is the mechanism used by Shipa to enable DevOps teams to create one or multiple application-level policies to be enforced when developers deploy their applications and for Shipa to connect to your destination cluster.
You can find detailed information about Shipa Policies and how to create them with Crossplane here.
You can create a sample policy by running the following command:
kubectl apply -f shipa/policy.yamlYou can verify the policy created using Shipa’s dashboard by clicking on the Frameworks link in the menu.
Connecting Policy and Cluster
You can now connect the created policy to the application cluster you created using Crossplane.
You can find a template at shipa/connect-cluster.yaml. You can use this file to connect the policy to the cluster. Before you apply this definition, make sure you update these 3 fields:
- Address: The Cluster IP address for Shipa to connect to
- caCert: The certificate to be used by Shipa when connecting to your application cluster
- Token: The token for the Shipa service account you have previously already created in the application cluster.
The information above should all be from the destination/application cluster, not your “controller cluster.”
You can find detailed information about retrieving the information above here.
*** If you decide to create this process as part of your CI/CD pipeline, you can use Crossplane to create the service account for Shipa, retrieve and store the information above, and update the connect-cluster.yaml file with them at the delivery step.
Once you have the file ready, just run the following command:
kubectl apply -f shipa/cluster-connect.yamlDeploying Applications
Let’s now create and deploy a sample application using the app-deploy.yaml sample file. You can do it by running the following command:
kubectl apply -f shipa/app-deploy.yamlThe command above will create and deploy an application called cp-bulletin.
As you deploy the application, Shipa will automatically enforce the policies you defined, will automatically hook up monitoring, application audit, dependency maps, and more, delivering a complete application platform right out of the box and saving you from the hassle of installing, integrating, and managing several independent components that you would need to deliver that.
You can find detailed information about application definitions with Crossplane here

Conclusion
In just a few steps and minutes, you have delivered a scalable model and integrated platform your DevOps team can use to define and enforce policies while enabling a self-service model for developers, with a much easier and application-focused definition.
You can find a detailed video with the steps above from a recent webcast we had here:
We also have available detailed information about Shipa’s provider for Crossplane here
We hope this was helpful to show you a way to save months worth of work and position you to deliver value quickly to multiple teams in your organization.