Developing and deploying applications to Kubernetes locally with Shipa and Minikube
In a previous article, we discussed why we frequently hear that developers are not that keen on Kubernetes. You can read it here.
In summary, while developers certainly see the value of Kubernetes, they want to continue focusing on their application code and updates and not be impacted by the company’s Kubernetes initiative, which is quite fair.
I’m sure that developers, platform engineers, and DevOps engineers have all explored available solutions to mitigate the amount of infrastructure-related work that Kubernetes adds to the developer’s workload. While there are a few options available, developers quickly discover that these tools bring additional difficulties, such as:
- Integrating their development workflow into the overall organization’s structure and requirements is a challenge.
- When using these tools, it’s hard for the developer to comply with security, resource utilization, and more.
- It’s not always easy to migrate locally developed applications to Test and Production clusters. It ends up requiring some level of YAML and object manipulation to make their apps work on different clusters.
- It’s challenging to have a “production-like” environment locally.
- And more…
While developers certainly see the value of Kubernetes, they want to have the capability to continue focusing on their application
To address the challenges, developers we have spoken with say that they need a solution that:
- Allows developers to focus on code only and remove the need to create and maintain objects and YAML files
- Makes application deployment on Kubernetes locally easy so they can quickly test their applications and updates.
- Facilitates moving the applications from their local environment to other clusters, e.g., Test, Production, etc.
- It empowers them to leverage a production-like environment locally, where they can work with the same settings required around application performance, monitoring, security, and more.
To help achieve this, I am detailing below how to implement Shipa and Minikube, which will give you both a local Kubernetes cluster and Shipa’s application framework.
Installing Minikube
To install Minikube, you just need to follow step 1 described in the following link:
https://minikube.sigs.k8s.io/docs/start/
Installing Virtualbox
We will be using Virtualbox as the driver for our Minikube.
Virtualbox provides packages for the different operating systems, which you can download from the following link:
https://www.virtualbox.org/wiki/Downloads
Starting a Cluster
Once you install both tools, it’s now time for you to get a cluster running, which you can do using the following command:
minikube start --kubernetes-version='v1.18.2' --memory='5gb' --disk-size='20gb' --driver=virtualbox
The command above will create a Kubernetes cluster version 1.18 with 5GB of memory and 20GB of disk. Even though you can adjust this as needed based on the resources you have available, keep in mind the amount of resources you need to run Kubernetes and your apps when resizing this.
Running the command above will give you an output similar to the one below:
❯ minikube start --kubernetes-version='v1.18.2' --memory='5gb' --disk-size='20gb' --driver=virtualbox
* minikube v1.14.2 on Darwin 10.15.6
* Using the virtualbox driver based on user configuration
* Starting control plane node minikube in cluster minikube
* Creating virtualbox VM (CPUs=2, Memory=5120MB, Disk=20480MB) ...
* Preparing Kubernetes v1.18.2 on Docker 19.03.12 ...
* Verifying Kubernetes components...
* Enabled addons: storage-provisioner, default-storageclass
* Done! kubectl is now configured to use "minikube" by default
To make sure your cluster started successfully, you can run the following command:
❯ kubectl get nodes
NAME       STATUS   ROLES    AGE     VERSION
minikube   Ready    master   2m39s   v1.18.2
Installing Shipa
With your local cluster running, you can now install Shipa.
Shipa can be downloaded and installed in your local cluster as a Helm chart. You can download Shipa’s Helm chart using the following command:
git clone https://github.com/shipa-corp/helm-chart.git
Once the download is complete, you can access Shipa’s Helm chart by simply entering the following:
cd helm-chart/
Inside the folder, you will now apply the resource limits to the services created by Shipa using the following command:
❯ kubectl apply -f limits.yaml
limitrange/limits created
With the above completed, you will now update the chart dependencies using the following command:
❯ helm dep up
load.go:112: Warning: Dependencies are handled in Chart.yaml since apiVersion "v2". We recommend migrating dependencies to Chart.yaml.
Saving 2 charts
Downloading docker-registry from repo https://kubernetes-charts.storage.googleapis.com
Downloading mongodb-replicaset from repo https://kubernetes-charts.storage.googleapis.com
Deleting outdated charts
Now its time for you to install Shipa in our local cluster. You can do it by running the Helm command below:
helm install shipa .
--timeout=15m
--set=auth.adminUser=admin@shipa.io
--set=auth.adminPassword=shipa2020
--set=shipaCore.serviceType=ClusterIP
--set=shipaCore.ip=10.100.10.20
--set=service.nginx.serviceType=ClusterIP
--set=service.nginx.clusterIP=10.100.10.10
Shipa Credentials
Please note that the command above provides the credentials you will use when logging into your local Shipa instance. In this case, the command above sets admin@shipa.io as the Admin user and shipa2020 as the password. You can adjust this before running the command above.
Install Completion
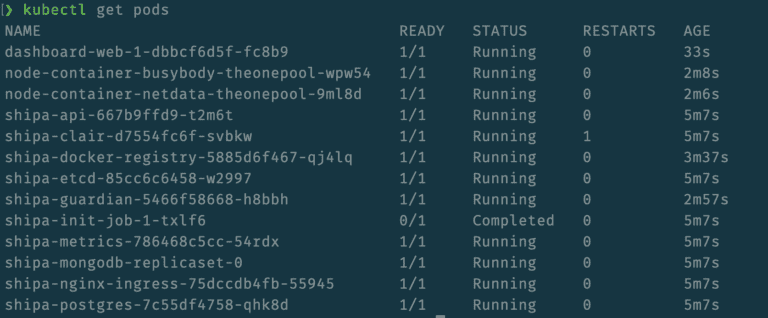
The install process should take a few minutes, which can vary depending on the amount of memory allocated to your local Kubernetes cluster. One easy way to identify when Shipa’s install is complete is to make sure you see the shipa-init-job-x market as completed and dashboard-web-x pods created and running. You can check it using the following command:
Once running, you should now add routes for Shipa’s ingress, which can be done with the commands below:
Route for NGNIX:
❯ sudo route -n add -host -net 10.100.10.10/32 $(minikube ip )
Password:
add net 10.100.10.10: gateway 192.168.99.106
Route for Traefik:
❯ sudo route -n add -host -net 10.100.10.20/32 $(minikube ip )
add net 10.100.10.20: gateway 192.168.99.106
With Shipa install and routes in place, you will need to download Shipa’s CLI to your local machine. Shipa’s CLI is available for different operating systems, and download links can be found here:
https://learn.shipa.io/docs/downloading-the-shipa-client
With Shipa’s CLI in place, the last step is to add your local instance of Shipa to your CLI as a Shipa target, which you can do by using the command below:
❯ shipa target-add -s shipa-v11 10.100.10.10
New target shipa-v11 -> https://10.100.10.10:8081 added to target list and defined as the current target
With your local Shipa instance added as a target, you can use the login command:
❯ shipa login
Email: admin@shipa.io
Password:
Successfully logged in!
The Email and Password used above are the ones used in the Helm install command.
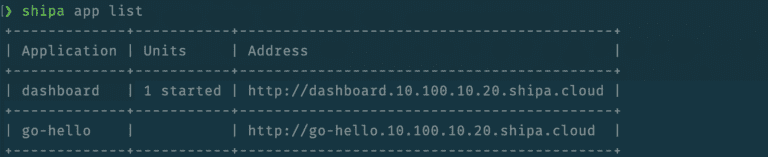
With the login complete, you can now find the address to Shipa’s dashboard by using the following command:
❯ shipa app list
+-----------------+-------------+----------------------------------------------------+
| Application     | Units       | Address                                            |
+-----------------+-------------+----------------------------------------------------+
| dashboard       | 1 started   | https://dashboard.10.100.10.20.shipa.cloud          |
+-----------------+-------------+----------------------------------------------------+
If you access the address displayed above, you will see Shipa’s dashboard:
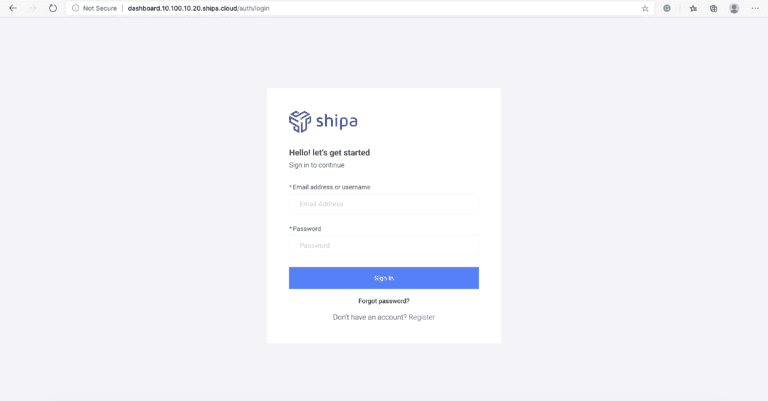
The login credentials are the same ones you set up when installed Shipa using the Helm install command and the one you used to log in through the CLI.
Deploying a Sample Application
With Shipa and Kubernetes in place, we can now deploy our first application.
There are multiple ways of deploying applications on Shipa, and both are covered below:
- Using a pre-built image
- Deploying from source
Using a pre-built image
It’s possible that there is already a Docker image in place, and you want that image to be deployed to Kubernetes by Shipa. If that’s the case, you can follow the steps below:
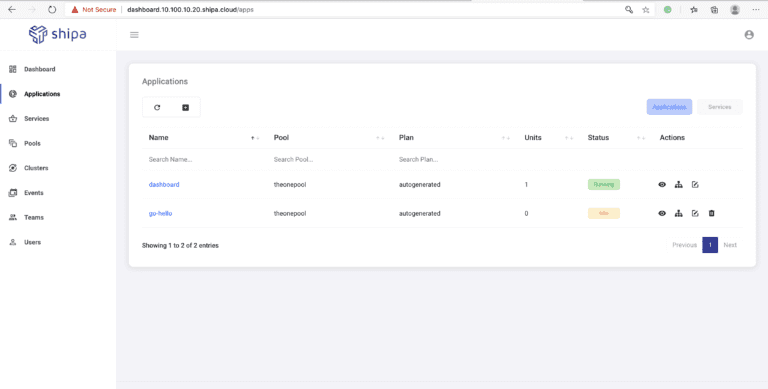
Create an application on Shipa:
❯ shipa app create go-hello -t admin
App "go-hello" has been created!
Use app-info to check the status of the app and its units.
Your repository for "go-hello" project is "git@10.100.10.10:go-hello.git"
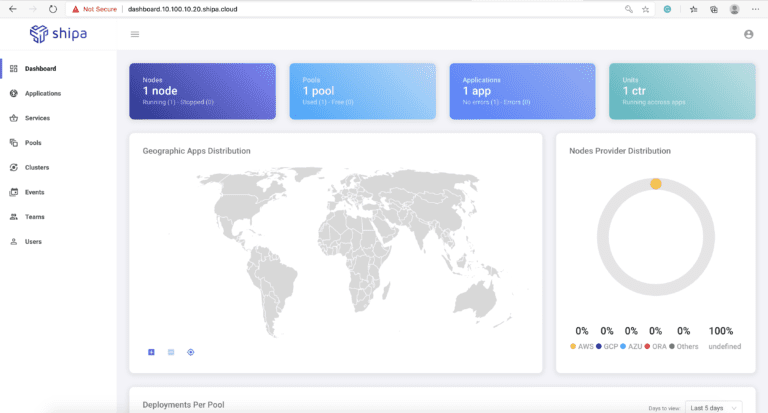
The command above will create an application framework that will then be used by Shipa to deploy your application and, once deployed, give you an application context view and operation level. Once you execute the command above, you will be able to see your application both in the Shipa dashboard as well as through the Shipa CLI:
View from the dashboard:
Deploy the image to Kubernetes through Shipa:
When deploying, you should use the command app deploy, as shown in the example below:
❯ shipa app deploy -a go-hello -i gcr.io/cosimages-206514/golang-shipa@sha256:054d98bcdc2a53f1694c0742ea87a2fcd6fc4cda8a293f1ffb780bbf15072a2b
The image used below is a sample Golang application that you can also use as a test. Once the deployment process is complete, you can see the application in a running state in Shipa’s dashboard:
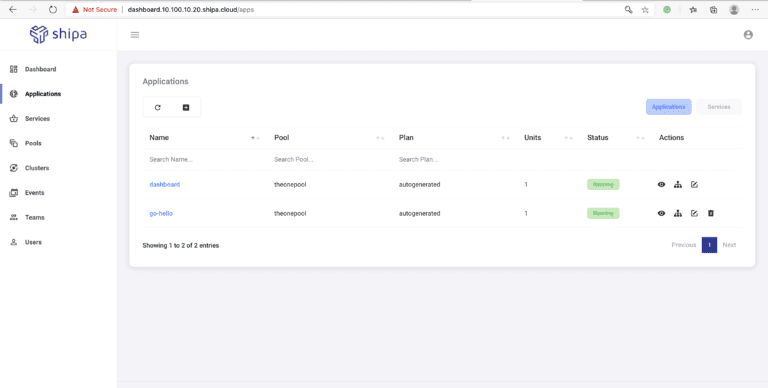
From there, you can see your application endpoint URL, monitoring, metrics, and more.
Deploying from source
You also have the option to deploy your application directly from source, so it saves you the time of having to build and manage Docker files, images, and more.
When deploying from source, you can deploy from source located in your local machine, deploy directly from your CI pipeline, or using your local IDE. For the sake of simplicity, in this document, we will deploy from source located in your local machine.
Compared to deploying from an image, the first difference when deploying from source is that you need to enable the language support (or platform as called inside Shipa) for your application. Since we will use a Ruby sample application, we should then enable the Ruby platform on Shipa:
❯ shipa platform add ruby
Once the process is complete, we can then create the framework for our Ruby application:
❯ shipa app create ruby-app1 ruby -t admin
App "ruby-app1" has been created!
Use app-info to check the status of the app and its units.
Your repository for "ruby-app1" project is "git@10.100.10.10:ruby-app1.git"
The command above sets the application name and sets the application platform, which, in our case, is Ruby.
You can find detailed information about application management on Shipa through the following link:
https://learn.shipa.io/docs/application
For our sample Ruby application, you can download the source code from the following Git repository:
❯ git clone https://github.com/shipa-corp/ruby-sample.git
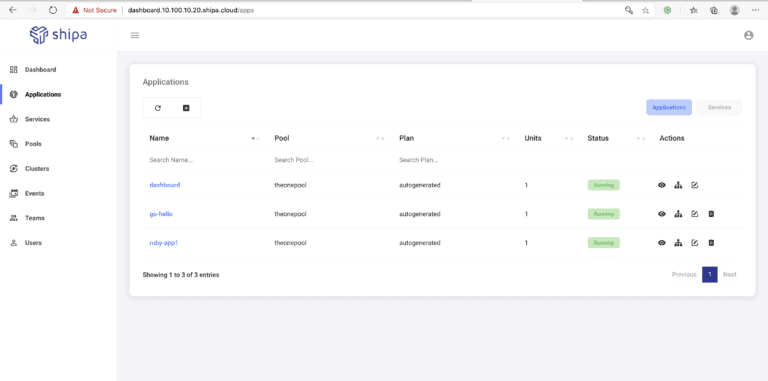
Now, you can then deploy the Ruby source code by using the command below:
❯ shipa app deploy -a ruby-app1 -f ruby-sample/
The command above will build the image required to run the Ruby application and deploy it to Kubernetes using Shipa. Once the deployment process is complete, the same way as before, you can see your application available both through the Shipa CLI and dashboard:
There is just so much more you can do with Shipa. Still, hopefully, this helped you learn how you can deploy and test your applications locally in Kubernetes using Shipa as your application framework without having to create images, objects, YAML files, and others, so you can speed up your development process.
In the next blog entry, we will discuss how to move these applications from your local environment to other clusters that you may have using Shipa.