Addressing FluxCD’s challenges
The idea to fully manage applications and infrastructure using a Git-based workflow, or GitOps, is gaining a lot of traction recently. We are seeing more and more Shipa users adopting GitOps as the cloud-native deployment methodology.
While it is no secret that ArgoCD and FluxCD are by far the most used tools today, we see FluxCD users trying to address the challenges below:
- The lack of an application or developer portal makes it difficult for developers to support their applications post-deployment
- Multi-tenancy is not a built-in functionality of FluxCD, making it tricky to adopt the tool across distributed teams and applications with different security requirements.
- Users are looking for ways to improve the developer experience when using FluxCD and GitOps, in general, to help speed up the adoption of GitOps faster in the organization.
There is quite a bit to cover for each point above, so in this post, we will tackle the first point: How Shipa adds a developer portal to FluxCD when used together.
Here is the architecture we will be using on this example:

- Shipa Cloud: I have created my Shipa Cloud account on https://apps.shipa.cloud
- K8s GitOps Cluster: That’s my central “GitOps” cluster that I will use to centralize FluxCD.
- FluxCD Git Repo: FluxCD automatically created this repository during install, and it hosts both the application and infrastructure definitions for FluxCD
- Application Git Repo: That’s where I store my application definition file so FluxCD can sync it with Shipa and have my application deployed
- K8s App Cluster: A Kubernetes cluster connected to a Shipa policy framework for application deployments
Installing FluxCD
To install FluxCD, I have followed the “Bootstrap” instructions from the following link:
Installation | Flux (fluxcd.io)
In summary, here is what I did:
I first installed the FluxCD CLI using the following command:
brew install fluxcd/tap/flux
With the CLI installed, I exported my Github user token, so FluxCD can log into it, create a repository, and push its configuration files. I exported my Github token using the following command:
export GITHUB_TOKEN=ghp_xxxXXXxxxXXX0000XXXxxx
Once I exported my Github token, I used the FluxCD CLI to bootstrap the install with the following command:
flux bootstrap github
  --owner=brunoa19
  --repository=fluxcd
  --path=clusters/my-cluster
  --personal
Install the Shipa provider
For this example, we decided to use Shipa’s provider for Crossplane so that you can leverage the provider for application deployment and cluster management later. To keep it simple for this blog, we will only cover the application part.
You can install the provider by following the instructions available here:
We won’t be going into the details of how to create policy frameworks in Shipa or connect clusters to it, but you can find detailed information here:
- Frameworks: Framework Management (shipa.io)
- Connecting frameworks to clusters: Connecting Clusters (shipa.io)
With both the Shipa Provider and FluxCD installed, we can now create and deploy our application.
Creating the Application Git Repository
For simplicity, you can clone the following repository:
brunoa19/flux-prod (github.com)
Inside the app1 folder, you will find our sample application definition. In the definition file, we are:

App creation:
- Name: defining the application name to be used by Shipa when creating the application itself.
- Team owner: The team that should own the application
- Framework: The policy framework Shipa should use when deploying the application
App deployment:
- App: the name of the app. The one created in the step above.
- Image: the address of the Docker container image for the application
The definition is quite simple and abstracts the developer away from the infrastructure since the developer does not know what cluster provider or version the DevOps team is using, which ingress controller you are using in the cluster, and more.
Now, let’s configure FluxCD to monitor this Git repository.
Configuring FluxCD to monitor the repository
For FluxCD to monitor and act on our application repository, you must add its information to our FluxCD Git repository.
With this repository cloned into your local machine, you can use the following command to have FluxCD create the configuration YAML:
flux create source git flux-dev
 --url=https://github.com/brunoa19/flux-prod
 --branch=main
 --interval=30s
 --export > ./clusters/my-cluster/prod-app1.yaml
This will create a file similar to the one below:

The file above “tells” FluxCD to watch our fluxcd-prod repository.
Commit and push the changes using Git:
git add -A && git commit -m "Add fluxcd-prod Git Repository"
git push
FluxCD does not yet deploy our application, and we need to create a Kustomization resource for FluxCD to do so. You can do it using the following command:
 flux create kustomization prod-app1
 --source=flux-prod
 --path="./app1"
 --prune=true
 --validation=client
 --interval=1m
 --export > ./clusters/my-cluster/dev-prod-kustomization.yaml
Commit this file and push it to Git:
git add -A && git commit -m "Add fluxcd-prod Kustomization"
git push
Thats it!
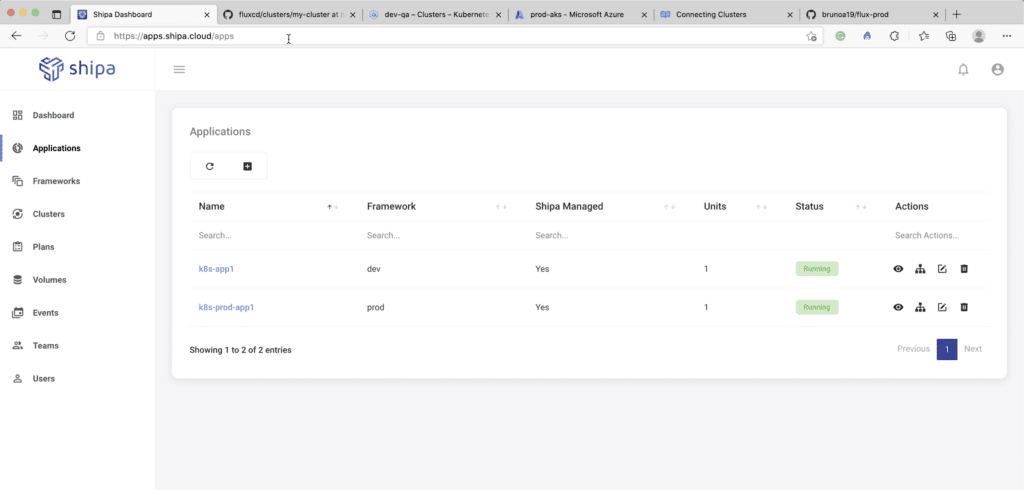
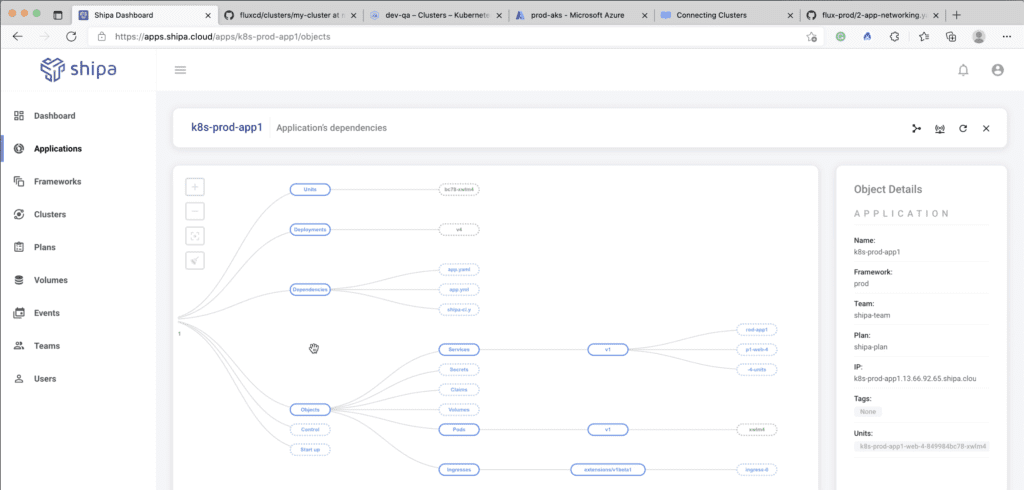
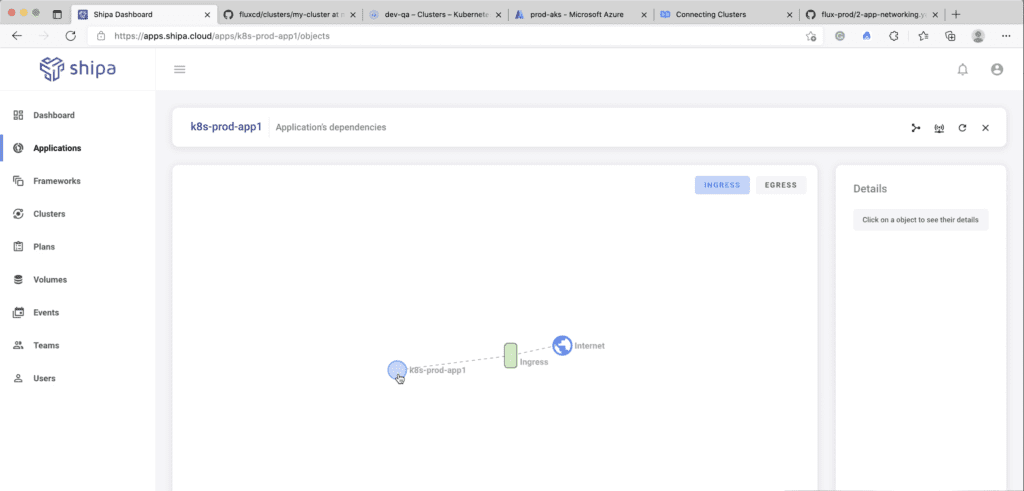
If you now head over to your Shipa Cloud dashboard, you will see your application is created and deployed to your K8s App Cluster by Shipa:
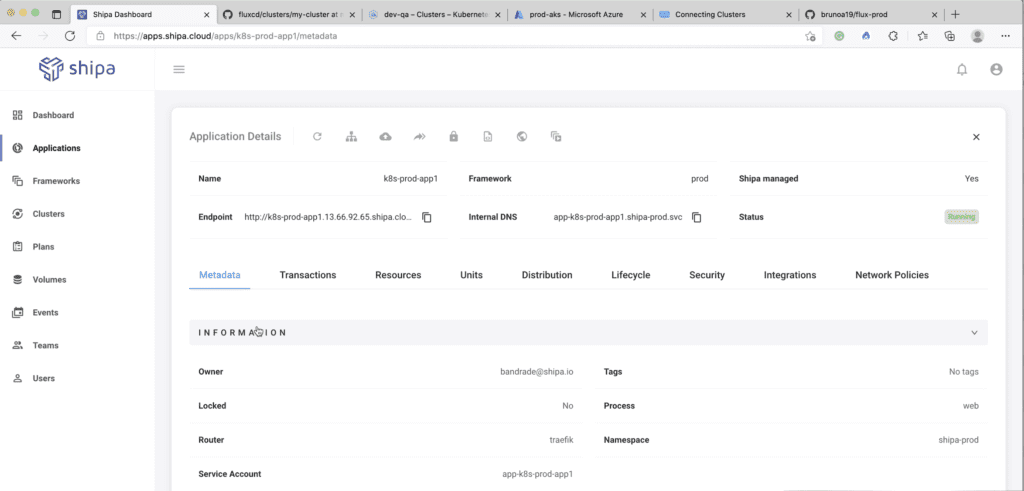
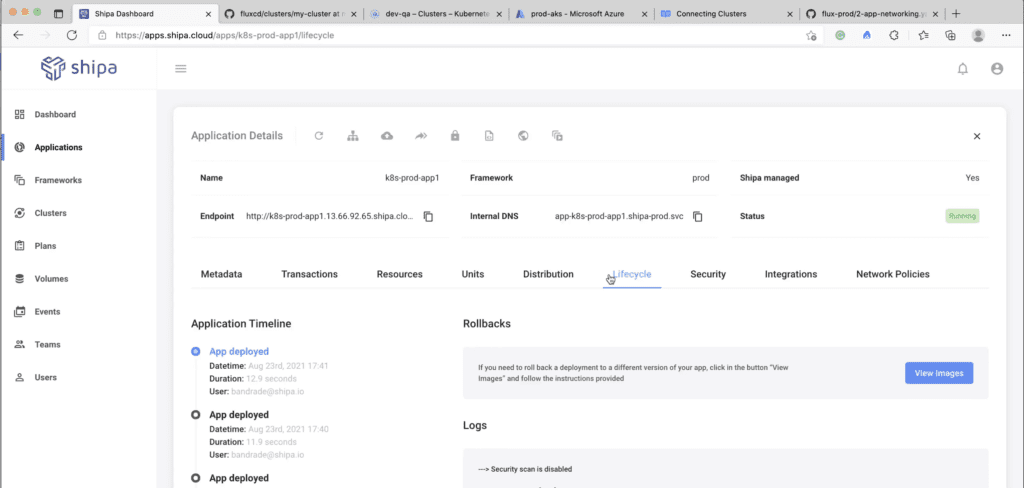
By integrating Shipa with FluxCD, you and your users now have complete control and information of who owns each application, resources attached to it, application lifecycle information for audit, and more:
What’s Next?
Stay tuned as we cover how an AppOps layer with Shipa can help you implement multi-tenancy for FluxCD and address challenges such as Developer experience and more in the next blog post.