TL;DR
- While there are different ways to implement policies in Kubernetes, this tutorial demonstrates an application-focused approach that removes complexity, is scalable, and is cluster agnostic.
- Being able to effectively report on policies enforced and changes made to policies definitions is as important as the policy enforcement itself.
- Integrate policy changes into your alert and management stack so different teams can be aware of any policy additions, changes, or deletions.
Background
A while ago, we wrote about using GitHub Actions to enable a developer-friendly CD process for Kubernetes. The goal was to show how DevOps or Platform Engineers could give developers an easy way to define and deploy their applications themselves with the target of implementing a self-service model.
Since we can use GitHub Actions to improve the developer experience on Kubernetes, why not also use it for implementing application-level policies on Kubernetes, and as a result, have a complete application platform that is scalable and driven by a declarative and application-focused approach?
The Stack
GitHub Actions
GitHub Actions is an event-driven automation platform that allows you to run a series of commands after a specified event has occurred. For example, when a commit is made to your staging branch, you want to build, test, and deploy the changes to your staging environment. With Actions, you can automate tasks within your development lifecycle, all within GitHub.
Shipa
Shipa is an application platform that enables developers to deploy and manage cloud-native applications. Developers from small to large enterprises use Shipa today to manage their cloud-native application lifecycle and is quickly becoming the application platform of choice for Kubernetes.
Kubernetes
Kubernetes is an open-source container-orchestration system for automating computer application deployment, scaling, and management. It was originally designed by Google and is now maintained by the Cloud Native Computing Foundation.
Requirements
- A GitHub repository to store your policy definitions (Sample repo here)
- A Shipa Cloud account (Create a free account here)
- A Kubernetes cluster (see the list of supported cluster providers here)
Implementing
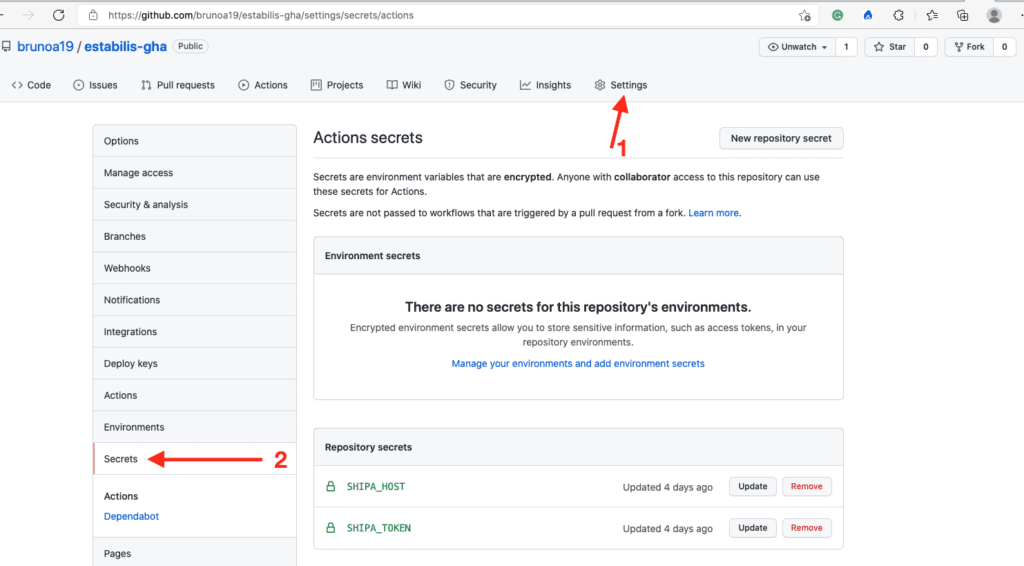
Configuring Secrets
With our requirements ready, let’s get started.
We will use the Shipa Action for GitHub Actions to make this process easy. (You can show some love and support by giving it a star here)
For this action to work, you need to set 2 variables:
- SHIPA_HOST
- SHIPA_TOKEN
You can set both using GitHub Secrets.
For SHIPA_HOST, if you are using Shipa Cloud (not Shipa self-hosted), you can use the following value: https://target.shipa.cloud:8081
For SHIPA_TOKEN, you can use your Shipa CLI to find your token. If not already installed, you can install the Shipa CLI by running the following command:
curl -s https://storage.googleapis.com/shipa-client/install-cloud-cli.sh | bashWith the Shipa CLI installed, you should add your Shipa target and log in. You can do it by using the commands below.
Adding target:
shipa target add cloud-production target.shipa.cloud -sLogging in:
shipa loginDisplay token:
shipa token showDefining Your Policy
You can now define a sample policy to test the deployment.
You can find a sample policy here
framework:
  name: gha-policy1
  resources:
    general:
      setup:
        provisioner: kubernetes
      router: traefik
      appQuota:
        limit: "4"
      security:
        disableScan: true
      networkPolicy:
        ingress:
          policy_mode: deny-all
        egress:
          policy_mode: deny-all
        disableAppPolicies: false
      access:
        append: ["shipa-team"]
This is a simple policy, and it enforces:
- The ingress controller applications should use when deployed using this policy
- Application scalability limits
- The security scanning level. It disables security scanning in this case.
- A default network policy
- Which team/s can deploy applications using this policy
You can find detailed information and the policies supported here
Connecting Policy to Cluster
Once you store the policy definition in Git, you should now use a cluster definition to “tell” Shipa which cluster this policy should be bound or connected to. You can connect one or multiple policies to the same cluster. Once connected, each policy will become a namespace in your cluster, and every application deployed using this policy will be deployed in that namespace.
You can find a sample cluster definition here
cluster:
  name: gha-oke-cl
  endpoint:
    addresses: ["https://xx.xx.xx.xx:6443"]
    caCert: ./infra/cert.crt
    token: ./infra/token
  resources:
    frameworks:
      name: ["gha-policy1"]
For the policy to successfully be connected to your cluster, you will need to declare the following:
- The Kubernetes cluster address
- The CAcert and Token for the Shipa service account
- The policy frameworks you want to connect to that cluster
You can find detailed information on how to create a service account for Shipa in your cluster and gather the information above here
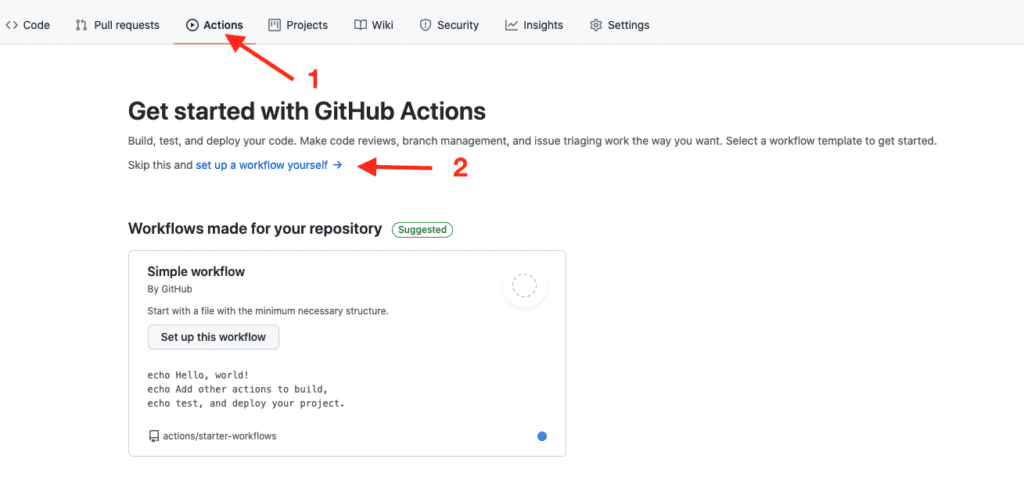
Creating The Action
With both the cluster and policy definitions stored in your repository, you can create an Action.
Click on “Actions” then on “set up a workflow yourself.”
You can find a complete Git Action here
The action above will create the policy, connect it to a cluster, and deploy multiple applications using the defined policy.

Application Dashboard
Once your policy is created and connected to a cluster, you can see detailed information about your policies, clusters, and applications using your Shipa Cloud dashboard
Conclusion
In just a few steps, you have set up a policy pipeline for Kubernetes. This will allow you and your team to quickly secure applications without spending time dealing with the underlying infrastructure complexities.