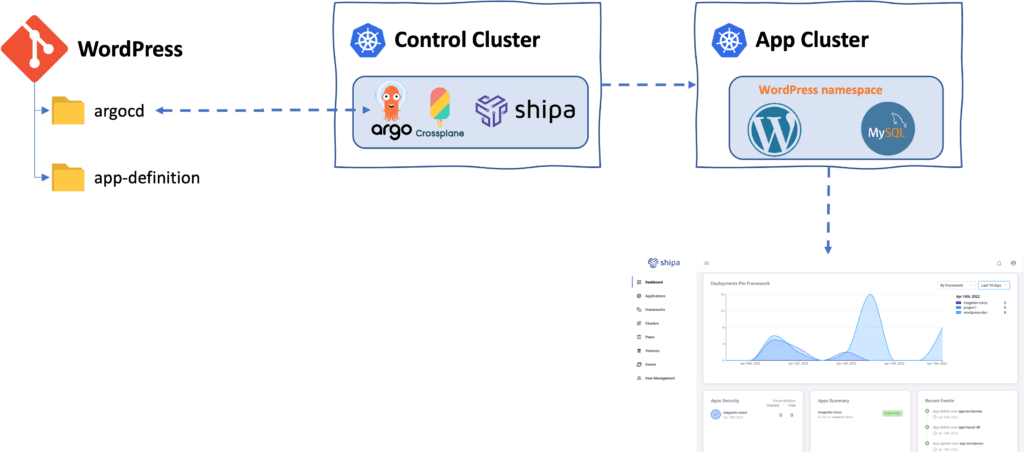
WordPress is a popular platform for editing and publishing content for the web. This tutorial will walk you through how to build out a WordPress deployment using Kubernetes, ArgoCD, Crossplane, and Shipa.
WordPress consists of two major components: the WordPress PHP server and a database to store user information, posts, and site data. We will define these two components and store them in a Git repository.
Architecture Overview
We will implement this architecture as a result of the following steps:
GitHub Repository
We have a single repository broken down into two folders, one for the ArgoCD definition and the application definition itself.
You can find the repository available here: https://github.com/brunoa19/wp-crossplane-argo
Control Cluster
My control cluster will be responsible for hosting my “GitOps stack”. It will be separate from my “application clusters”, so it is easy for me to continue scaling across multiple clusters later. In my control cluster, I have installed::
- ArgoCD: I followed the basic instructions available here: https://argo-cd.readthedocs.io/en/stable/getting_started/
- Crossplane and Shipa: Detailed instructions on installing Crossplane and the Shipa provider are available here: https://learn.shipa.io/docs/cp-installing-shipa-provider
Application Cluster
I will use a GKE cluster to host my WordPress application.
Since we will be leveraging Shipa, I will create a policy framework on Shipa and connect it to my application cluster, which will, in turn, create a namespace for it as soon as I connect the Shipa policy framework to my cluster.
The great side of this approach is that both ArgoCD and Crossplane only point to the Shipa Policy Framework when deploying the applications. This provides a scalable and secure way to keep adding multiple clusters and applications, creating a solid multi-tenant environment.
Internal Developer Portal
ArgoCD does come with a web interface, but we will leverage Shipa’s portal instead since it provides me with more in-depth information about my application and gives me Enterprise-level functionality that is easy to configure, policies, and more.
The portal will automatically show the application details as you deploy the application.
Requirements
You will need the following:
- A Kubernetes cluster
- A Shipa Cloud account (you can create a free account here)
- ArgoCD, Crossplane, and Shipa provider installed in your control cluster
- ArgoCD install instruction: https://argo-cd.readthedocs.io/en/stable/getting_started/
- Crossplane and Shipa install instructions: https://learn.shipa.io/docs/cp-installing-shipa-provider
- A policy framework for the WordPress deployment connected to your application cluster.
More details on creating a framework and connecting to your cluster are available in an interactive mode here.
Deployment Definitions
Our WordPress deployment will be composed of:
- A volume for the MySQL database
- A volume for the WordPress deployment
- The MySQL deployment
- The WordPress deployment
During deployment, Shipa will automatically set up ingress for our application, create and deploy the objects required by the underlying cluster, etc. As a result, the definitions will be much simpler and easier to manage.
You can find the complete definition for the components above here: https://github.com/brunoa19/wp-crossplane-argo/blob/main/app-definition/wordpress.yaml
Let’s break down the deployment definition:
Creating Volumes:
apiVersion: shipa.crossplane.io/v1alpha1
kind: Volume
metadata:
  name: mysql-vol1
spec:
  forProvider:
    name: mysql-vol
    capacity: 10G
    accessModes: ReadWriteOnce
    plan: gke-appcluster-1

---

apiVersion: shipa.crossplane.io/v1alpha1
kind: Volume
metadata:
  name: wordpress-vol
spec:
  forProvider:
    name: wordpress-data
    capacity: 1G
    accessModes: ReadWriteOnce
    plan: gke-appcluster-1
Here we are creating the volumes for WordPress and MySQL.
We are setting up:
- The volume name
- The capacity/size of the volume
- The access mode as ReadWriteOnce
- The volume plan
** Volume Plans are how Shipa interfaces with the underlying cluster storage class. You can find interactive instructions on how to create a volume plan here.
MySQL Database deployment:
apiVersion: shipa.crossplane.io/v1alpha1
kind: AppDeploy
metadata:
  name: mysql-db
spec:
  forProvider:
    app: mysql-db
    image: "docker.io/mysql:5.6"
    appConfig:
      team: shipa-team
      framework: wordpress-dev
      env:
        - MYSQL_ROOT_PASSWORD=somewordpress
        - MYSQL_DATABASE=wordpress
        - MYSQL_USER=wordpress
        - MYSQL_PASSWORD=wordpress
    volumes:
      - mountPath: "/var/lib/mysql"
        name: mysql-vol
Here we are defining the following:
- Our application name
- The deployment image
- The team that will own this deployment (you can create multiple teams within your Shipa Cloud account or use the pre-created shipa-team)
- The policy framework connected to a cluster that you will use to secure the deployment
- The environment variables that MySQL needs to start up properly (feel free to adjust these values to your liking)
- The volume we created before that you will connect to your MySQL deployment, so you store data in an external volume.
WordPress deployment:
apiVersion: shipa.crossplane.io/v1alpha1
kind: AppDeploy
metadata:
  name: wordpress
spec:
  forProvider:
    app: wordpress
    image: "docker.io/wordpress:latest"
    appConfig:
      team: shipa-team
      framework: wordpress-dev
      env:
        - WORDPRESS_DB_HOST=app-mysql-db.shipa-wordpress-dev.svc
        - WORDPRESS_DB_USER=wordpress
        - WORDPRESS_DB_PASSWORD=wordpress
        - WORDPRESS_DB_NAME=wordpress
    port:
      number: 80
    volumes:
      - mountPath: "/var/www/html"
        name: wordpress-data
Here is what we have defined in our file:
- Your application name
- The image for the deployment
- The team that will own this deployment
- The policy framework used to secure the deployment
- The environment variables that WordPress needs to start up properly and connect to our MySQL deployment
Setting Up ArgoCD
Now that you understand each definition let’s set things up on ArgoCD using the UI.
** If you want to use the CLI, here is a sample of the definition you can use: https://raw.githubusercontent.com/brunoa19/wp-crossplane-argo/main/argocd/argocd-wordpress.yaml
Click on New App
In the configuration window, enter:
- The application name
- The project (I’m using the default one for demo purposes)
- Sync policy (I’m using Automatic, so ArgoCD automatically deploys the resources)
- The repository URL (the link to the wordpress.yaml file)
- The Path to the file
- Cluster URL (I’m using the default one since ArgoCD will communicate with the Shipa API for multi-cluster application deployment)

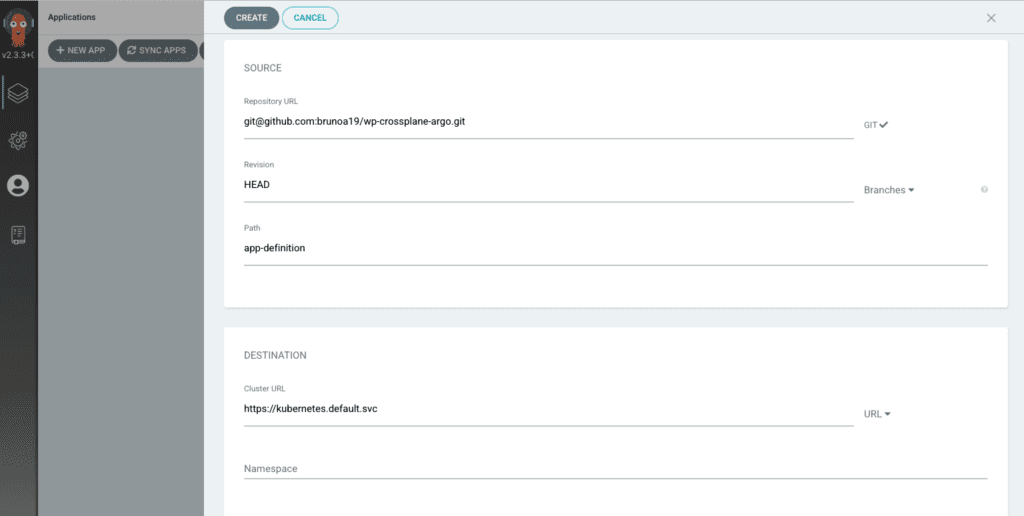
Click on CREATE
The deployment of your WordPress application will start automatically.
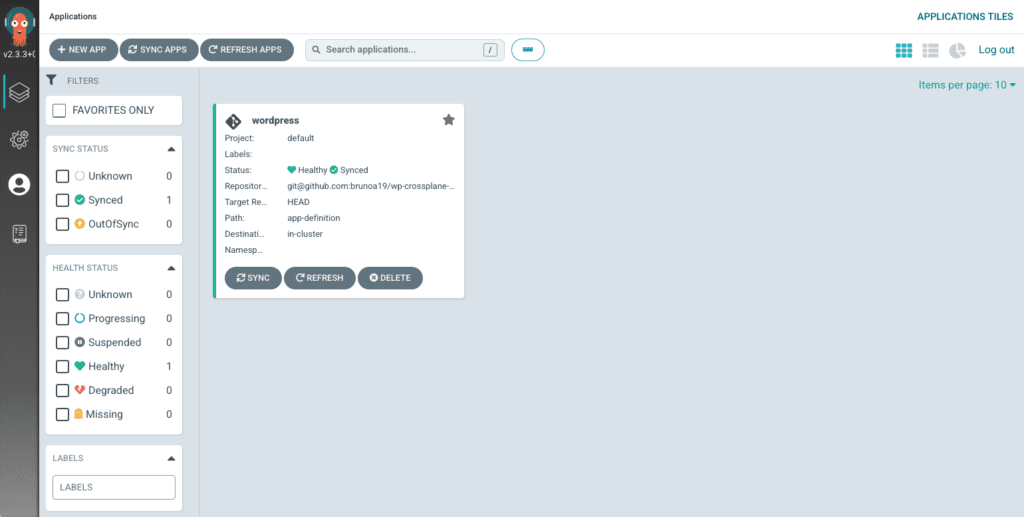
If you check your Shipa Cloud dashboard, you will see both deployments starting:

By clicking on the WordPress application, you can have full access to the information you need to support your application.
You can see monitoring information, application metadata, the application lifecycle for audit purposes, easily integrate into incident management tools, access to the application dependency map, service to service communication, and more.

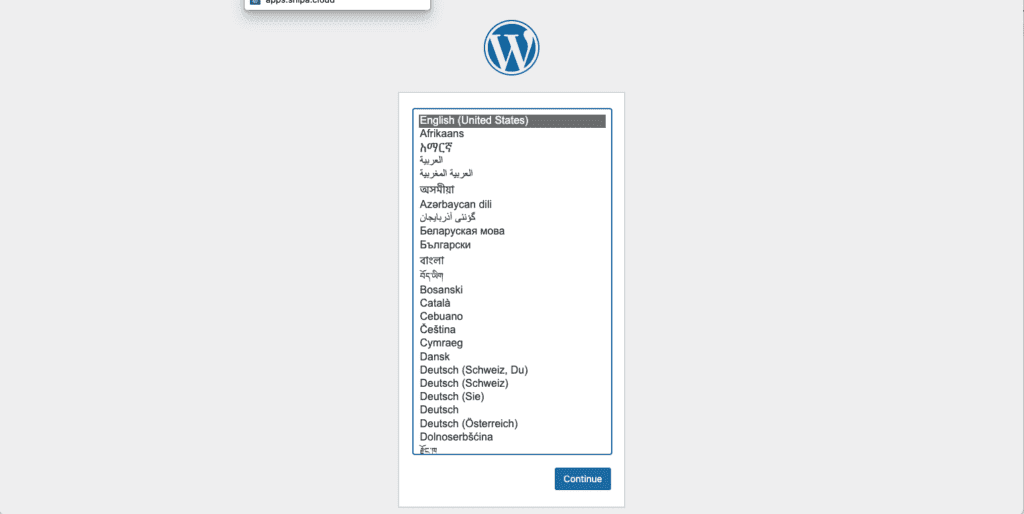
In addition, you will also notice that you can access the WordPress dashboard by clicking on the URL endpoint created automatically.
Conclusion
In conclusion, the steps above will deploy a WordPress application using GitOps along with a complete developer platform to help you secure and support your applications moving forward.
You can quickly address multi-tenancy by creating additional policy frameworks, connecting them to the same or different clusters, and pointing your additional deployments to the other frameworks, which will enforce security and isolation between deployments and teams.